
If you run a business without a Facebook business page, then you aren’t keeping yourself abreast of the latest trend?
Connecting with like-minded people and sharing ideas become so easy with the advent of Facebook. In this era of digital marketing, brands advertise their products and services and grow their business on social media platforms like Facebook. Be the small-sized or well-established company, each has aFacebook page that shares all the relevant information about the company, its products and services, trending offers, etc. On the same notion, it is important to create your Facebook business page to increase the engagement of your customers. How to do that? Let’s understand how to create a Facebook account for your business in simple steps.
How to create a Facebook Business Account: Let’s Begin

Firstly, you have to log into your personal Facebook account, then you can sign up for your Facebook business page. Don’t worry about the information on your personal account as it won’t appear publicly on your business page.
So, if you are not logged into your personal account, do it now. Because then only you can proceed with thePage creation steps.
Go to Choose the type of page you want to create from a business/brand/community/ or public figure. Here, we assume that you’re creating a page for business or brand. Click the button of ‘Get started’ by selecting the desired option.
Now, you need to enter your business information. In Page Name, write your business name or the name you want people to search for when finding your business.
Forcategory,type a word or two that will describe your business and Facebook will suggest you more options. If your business is more likely to fall in more than one category, then choose the one that most of your customers think suitable for your business.
After choosing your category, the box will appear that asks for more details like address and phone number. It is up to you whether to make this information public or to show your city and state.
Click Continue when you are ready. When you do so it means you accept Facebook’s Pages, Groups and Event Policies.
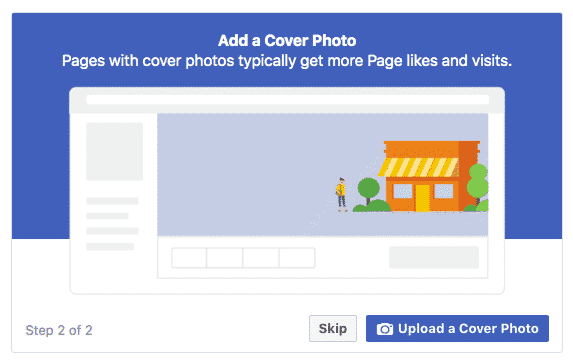
Step 2: Upload profile and cover images for Facebook page. It is important to choose images that resonate with your brand or business and that can leave a good impression on your audience.
Firstly, you will upload your profile image. When anybody searches for your business name it appears with it and when you interact with your users, the image will be there. It also displays on the topmost left of your Facebook page
After selecting the image of the appropriate size according to the Facebook specifications,Upload Profile Picture.

Now,choose the cover image and remember this image should describe the essence of your business or brand. After selecting the suitable image dimensions,Upload a Cover Photo.
Step3: Create a User Name
Your username can be 50 characters long and try to keep it short so that it can be remembered easily.
Click on Create Page@Username in the left menu to create your vanity URL.
Then, Click on Create Username after which a box will appear that provides you the links by which people can connect with your business on Facebook and Messenger.

Step 4: Add your Business details
It is important to fill all the relevant information about your business in this section right from the start. Because Facebook is the place where people come first to inquire about your business or brand, so to keep it updated should be your topmost concern.
Click on Edit Page Info in the top menu to fill all your business details.
Description: Here, you have to add a short description about your business that will appear in search results. Don’t elaborate it; keep it short to around maximum 255 characters.
Categories: You can see the categories here, which you entered in Step 1. If you wish to add a few more categories, you can do it from here so that Facebook shows your page to all your target audience.
Contact: Fill all your contact details that you want to make public like phone number, email, and website.
Location: If you have your physical office, mark its location on the Google Map correctly to make sure people can reach it without any hassle.
Hours: Mention the working hours of your business here so that people can visit you during these specific hours.
Extra options: Enter your impressum, price range and privacy policy link here if required.
An impressum is a legal statement of ownership and authority, which is required in European countries.
Click onSave Changesafter completing each section so that your changes can be implemented.
Step 5: Tell your Story
You’ve filled all the necessary details, but not yet mentioned why people should associate with your business? What’s unique about you?, etc.
In this section, you can add a longer description of your business and make it more engaging for your audience. To access it, clickSee morein the left menu, then click About, and at last click on Our Story on the right-hand side.
Enter a catchy headline and text for your story, then upload a relevant Facebook photo. Click on Publish after doing all this.
Step 6: Create your First Post
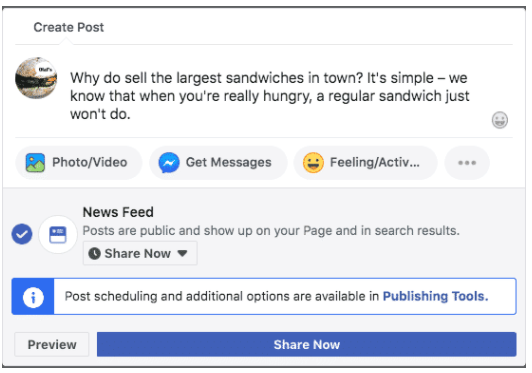
Create an appealing post with relevant information for your Facebook Page after this only, you can invite people to like your page. You can also share inspirational posts from successful leaders in your industry.
Adding to it, you can also create a specific type of post like an event or product offer by clicking on the options in the Create box at the top of your page.
Step 7: Publish your page and invite people
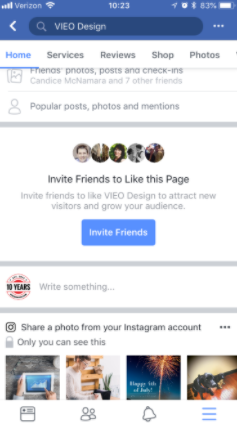
Now, you are all set to make your page live and let your customers see it. For this, you need to click on thePublic Page buttonpresent on the left hand side of the page.
Invite your friends to like your Facebook page and you can use other social media platforms like Twitter to promote it. You can also ask your customers to leave their reviews on your Facebook Page.
How to create an ad account on Facebook?
If you wish to run Facebook ads, it is not convenient for you and your team members to use your personal ad account to run the ads.
Here, we are going to explain how you can create a new ad account under Facebook business manager.
- Open a Facebook Business Manager
- Go to your Business Manager settings, you will see the tab “Ad accounts” under People and Assets, you will see Add New Ad accounts from a dropdown menu
- If you want to create a new ad account, click on Create a ‘New Add Account’
- Give the name to your Ad account and choose Time Zone and Currency.
- Add your name in the ‘Ad Account admin’ and your team members with their corresponding roles to this Ad account
- You need to add a payment method to activate the ad account. Then, Click on “Payment methods.”Note:The payment method should be set successfully to activate the campaign later.
- Now, select a Payment Method with Billing Country, Currency, Credit/Debit Card information.
- Now, please go back to the “Ad Accounts” where you will see your new Ad Account.
Remember, you can create maximum 2 Ad Accounts in your Business Manager.
If you already have an ad account, you can just add it to your Facebook Business Manager. In step 2, you can choose‘Claim an Ad account’and mention your existing account id to finish the settings.
How to link your Facebook Page from other web pages
Backlinks help you to increase the credibility of your Facebook business page and improve your search engine ranking. They encourage new potential followers to follow your page.
You need to add a link to your Facebook page at the bottom of your blog posts and wherever necessary on your website. Encourage other companies and bloggers to do the same thing when you collaborate.
Manage your Facebook business page along with other social media platforms using Rannkly.
Rannklyis an online reputation management tool that helps you to shape, redefine and improve your brand’s reputation through appealing features. It connects various review websites to one dashboard through which you can easily monitor, reply & analyse your customers’ reviews. It generates new reviews and engages potential customers to take your business to the next level.
Make your Facebook Business Page today if you want to see your business to attain newer heights. Create interactive posts that bring potential customers to your page where they will get an overall idea about your business.
Let your page convey detailed information about your brand.
If you’ve further questions, write to us atsales@rannkly.com, we will make every possible effort to resolve your query.
Happy Reading


/filters:format(webp)/assets/images/schedule-demo-2.jpg)